![]()
Project templates are a PRO Level feature and a great way to set your team up for success! They are preset fixture schedules and can be created for any of your common applications, to jumpstart projects or to generate sales leads on your website. They can be utilized within the portal to allow your team to get projects out quickly, on your website to allow specifiers to request quotes, or they can be used in a combination of ways to suit your team’s needs.
When utilized by your Agents and Customers, the Templates copy all stored information to a new Project to save time for your users and also help your team streamline their processes. The new Project will include any notes, budget information, products, CEUs, videos, etc. that have been included in the template and then your Agents and Customers can edit the preselected information to suit their current needs.
Templates can also be created and shared publicly on your Agency website to entice specifiers and generate leads for your team. You’ll just need to set the visibility on the template accordingly. Once set, users can search through your public templates and submit their information to kick start a similar project with your team from the Project Starter tab on your Interactive Line Card.

Want to save common unit pricing but wary of your customers getting ahold of the information too soon? Not to worry, while the template will duplicate all information that has been added to it, your team will still have to grant permission to any customer utilizing the template to access pricing information.
Creating a project template is easy, and they can be as broad or as detailed as you would like; it’s a very similar workflow to creating a project!
Any agent can create a new Project Template.
To create a Project Template:
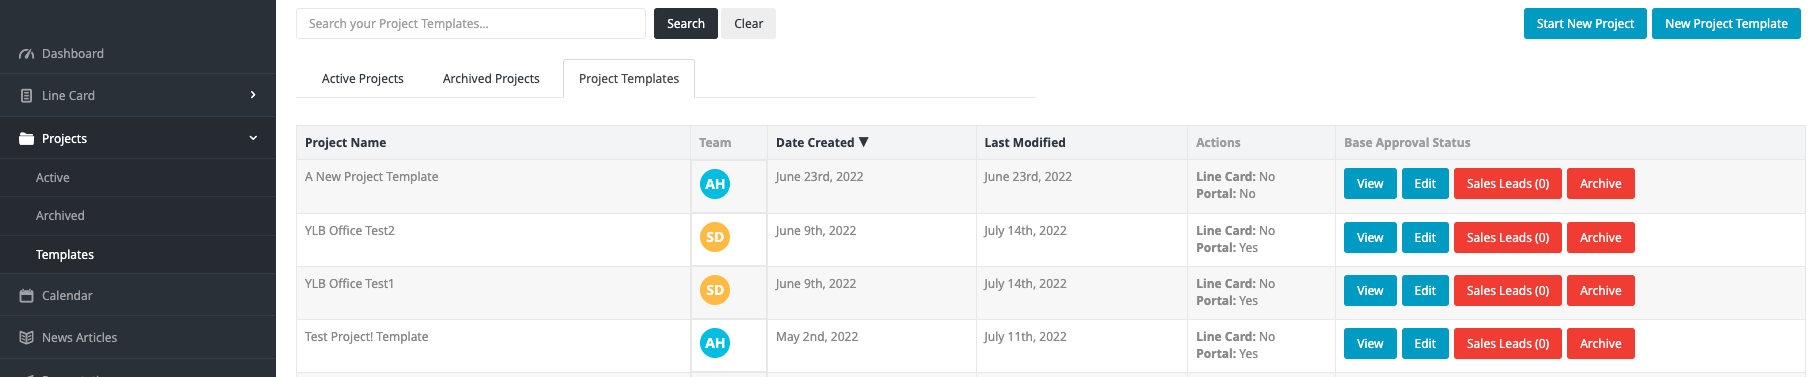
Go to the left sidebar navigation, click Projects and then Templates. This will take you to your agency’s templates viewing and editing page. Any member of your agency can create, view and edit a template from this page. Once created and published, your customers will be able to start projects from these templates as well.
Click the New Project Template button in the top right. Here you will name the template and add notes; these two items can be edited at any point.
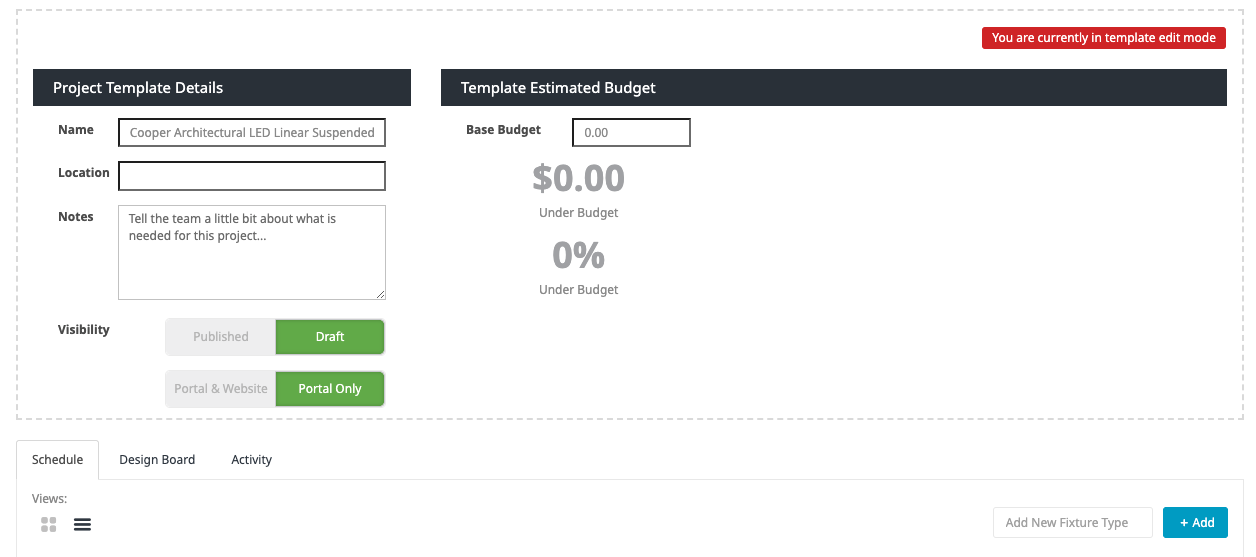
Start adding the details. Now your template is ready to be filled in. You can add products, fixture types, videos, application photos, etc. all in the same way you’d fill out a project. In fact, if you are having trouble telling whether or not you are in a template or a project you can tell by the section headers and the red “You are currently in template edit mode” banner at the top of your template screen.
When utilizing a template to jumpstart a project, all details are duplicated (application photos, specsheet URLs, budget/unit pricing, agency remarks, etc.) Agents and customers will be able to edit them to fit their needs but they will be tied to the template. Customers will not be able to see any budget or pricing that is tied to the template until their corresponding Agent grants them access.
You have the option to add products to Project Templates via the line card search or quick add buttons, whichever you prefer!
Set the Visibility. Once you have added all of your products, application photos, CEUs, videos, and materials to your template, you are ready to set the Visibility.
 You can set the visibility by toggling each option:
- Portal Only / Draft – select this when editing your template, it will not be accessible to anyone to view or use in this setting. The template is automatically set to these options when created. Portal
- Portal & Website / Published- select this to share the template on your Interactive Line Card on your Agency’s website as well as through the portal
- Portal Only / Publish – Agency teammates and Customers will be able to view within the portal and utilize the template to jumpstart a new project. This option will not make the template visible on your website.
Tip: Try to add at least one application photo that represents your template well prior to publishing with visibility on your website. This ensures a great look with an engaging image, rather than The Lighting Exchange® placeholder.
Tip: If you are sharing your Project Template on the Portal & Website to generate leads, you’ll want to have a teammate monitor the templates.
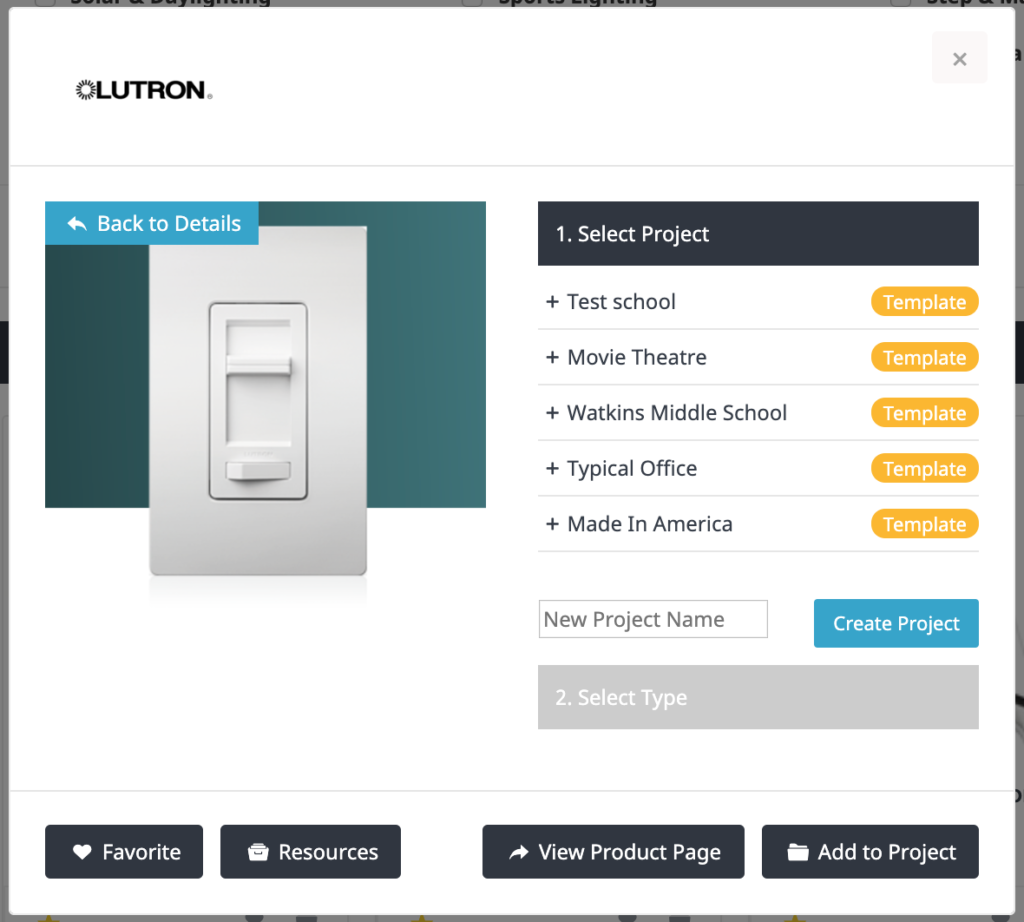
When customers are viewing the templates on your Interactive Line Card, they have the option to submit their information to convert the template into a project. This will show up as a Sales Lead in line with the template, the red button will have a number showing how many open leads are attached. Just click the button to find all of the information that was submitted with the inquiry.
